The heating kicks in with that familiar clunk, but one radiator in the hallway stays stone cold. You tap the valve like that’s going to magically fix anything. The rest of the house is warm, the windows are misting up, and you’re standing there in a jumper, staring at a piece of metal the size of a lemon that’s clearly in charge of your mood.
You Google plumbers, wince at the prices, and close the tab. Then you remember that friend who swore you could change a radiator valve “in like 20 minutes, tops” without draining the whole system.
You don’t fully believe them.
But the idea sticks.
Why you’d even want to change a radiator valve yourself
The first thing people think when a valve jams is: “This is going to cost me.” A stuck or leaking valve doesn’t look like a big deal, yet it can silently waste energy for months. One room overheats, another never warms up, and the boiler runs longer than it should.
You feel it as discomfort first, then as numbers on the bill. That’s usually when curiosity about DIY suddenly appears.
Picture this. It’s January, the kids’ room has a radiator that sounds alive but barely warms, while the living room is a sauna. The valve on the kids’ radiator spins freely like a toy, but nothing changes. A plumber can come… next Thursday.
So that evening, you’re on the floor with a torch in your mouth, watching videos of people undoing big chrome nuts with suspicious confidence. One of them calmly slides on a new valve, wipes a few drops of water, and that’s it. No flood. No chaos. Just heat.
You pause the video and study your own radiator like it’s a riddle.
There’s a simple reason this trick works. The pressure and water in a heating system are spread across a closed loop, but you don’t always need to empty the whole loop just to change one component. By isolating the radiator and controlling where the water can go, you turn a scary “full system job” into a local, manageable operation.
➡️ Homeowners furious over viral grout hack with just 3 ingredients experts warn it could cause hidden damage
➡️ Saudi Arabia and the United Arab Emirates import massive food supplies every year despite trillion-dollar desert farming plans
➡️ After A Difficult Transition In A Foster Home, A Senior Dog Finds Calm Thanks To An Unexpected Companion (Video)
➡️ How AMD’s latest AI chips seamlessly upgrade your home setup for 4K video
➡️ A Pool Noodle Will Change Your Life in the Kitchen: Here’s Why It Will Revolutionize Everything
➡️ A family pays 1800 euros for a rental in Spain When they arrive there is no house they call Booking and the calls are cut off
➡️ A homemaker filming strangers from her window says she’s “protecting the neighborhood” – but is she a public watchdog or just another stalker with a smartphone?
➡️ Winter storm warning issued as up to 55 inches of snow could fall, threatening to overwhelm roads and rail networks
It feels like cheating, but it isn’t. It’s just understanding where the water wants to go and politely blocking every exit except the one you control. Once that clicks in your head, the valve stops looking like a mysterious object and starts looking like a nut you can actually undo.
The practical method: changing the valve without draining everything
Start when the heating is off and the system is cool. That’s not a suggestion, that’s non-negotiable. Turn off the boiler and give the radiators time to lose their heat. Then close both ends of the radiator you’re working on: the hand valve (or thermostatic head) and the lockshield valve on the opposite side, using a small spanner to turn it gently clockwise.
At this point, that radiator becomes its own little island. Slide a tray or shallow tub under the valve. Crack open the bleed valve at the top of the radiator with a bleed key, just enough to release pressure. You’ll hear a soft hiss. That’s the system sighing.
This is where most people get nervous. They imagine a firehose of brown water blasting the wall. In reality, if the radiator is isolated and the bleed point is under control, you’ll only get as much water as is trapped in that single unit.
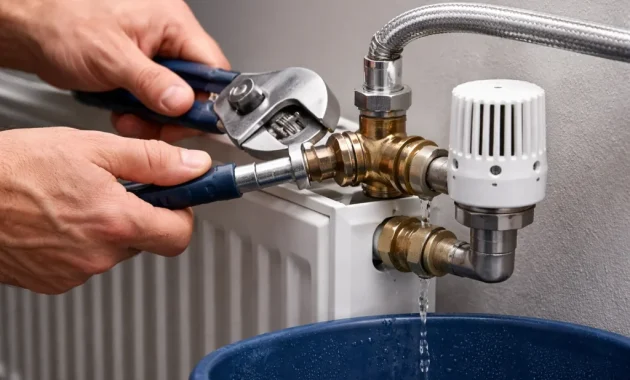
You slowly loosen the large nut connecting the old valve to the radiator tail, a quarter turn at a time. Water starts to dribble, then flow, into your tray. You adjust the bleed valve to speed it up or slow it down, like a tap. It’s surprisingly calm.
Ten minutes later, the tray is full, the radiator is basically empty, and the “big scary valve change” has turned into a slightly messy but very normal DIY moment.
The logic is simple, even if it feels intimidating the first time. The closed heating system is under pressure, but that pressure depends on space for water to move. By shutting the valves on both sides of a radiator, you’re putting that section on pause. That’s why you don’t need to drain the whole lot.
Once empty, you remove the old valve, wrap PTFE tape around the threads of the new radiator tail, and fit the new valve body in its place. Connections need to be firm, not brutal. Reconnect the pipework, re-tighten the nuts, close the bleed valve, then reopen the lockshield and the new valve slowly.
Water flows back in, the radiator refills, and the system pressure may nudge up a little on the boiler gauge. One small part swapped, no full-system drama.
Tips, mistakes and the tiny details that change everything
Lay out your gear before you touch anything. A couple of adjustable spanners, a bleed key, PTFE tape, an old towel, a tray, maybe a small bucket. Having everything within reach keeps you from panicking with a dripping valve in one hand and nobody to pass you a cloth.
Take photos before you start. One of the **simplest hacks** is just having a picture of how the old valve was positioned and how deep the nuts sat on the threads. It’s like leaving yourself a breadcrumb trail back to normal.
Where people often get into trouble is rushing the isolation step. The lockshield side sometimes looks stuck, or has a plastic cap that hides the square shaft underneath. You twist the plastic and nothing happens, and you think it’s closed when it’s not. Then you crack the valve and the water doesn’t stop.
There’s a moment of “oh no” that’s very real. This is where that tray and towel earn their keep. Deep breath, close the lockshield properly with a spanner, not the plastic cap, and the flow should calm down. *You’re allowed to feel clumsy during this bit.*
Let’s be honest: nobody really does this every single day. Even seasoned DIYers have that tiny spike of doubt when they first crack a pressurised joint.
Changing a radiator valve without draining the system isn’t about being fearless. It’s about being slow, prepared and a little bit stubborn with the details.
- Have two spanners so you can hold one nut still while turning the other. Less twist on the pipes, less risk of a leak later.
- Use PTFE tape in the right direction on the threads: wrap it clockwise as you look at the end of the fitting so it tightens in, not peels off.
- After refilling, bleed the radiator until water comes out cleanly, then check the boiler pressure and top up if it’s dropped.
- Feel every joint with dry fingers once the heating is back on. A tiny bead of water now is easier than a swollen skirting board in a week.
- Don’t overtighten: a firm, confident nip on the nut is safer than leaning your whole bodyweight into it.
Living with a system you understand, not fear
There’s a quiet shift that happens once you’ve changed a valve yourself. The heating system stops being this mysterious, humming beast in the background and becomes a set of circuits you roughly understand. You know where to look when a radiator stays cold, what a bleed screw feels like, where the pressure gauge usually sits on a normal day.
It doesn’t mean you suddenly become your own plumber. It just means the gap between “something’s wrong” and “I have to call someone” stretches a little. You can experiment with balancing radiators, upgrading to thermostatic valves, fine-tuning temperatures room by room. You begin to see how a small part at the end of a pipe can shift comfort, cost and mood.
Some people will read a guide like this and still decide to pay a professional, and that’s totally sane. Others will grab a spanner and a tray this weekend and quietly tick off a job they’ve been avoiding for two winters. Both choices are valid.
What changes everything is that you now know the full-system drain isn’t always the only path. That there’s a lighter, local way to act. And once you’ve watched your own radiator come back to life after you’ve refitted that new valve, the sound of it warming up feels a bit different.
More deliberate. More yours.
| Key point | Detail | Value for the reader |
|---|---|---|
| Isolate the radiator | Close both valves and open the bleed screw to release pressure | Prevents draining the whole system and avoids messy surprises |
| Work slowly with basic tools | Use two spanners, PTFE tape and a tray for controlled water release | Makes the job manageable even for cautious beginners |
| Check and restart properly | Bleed radiators and adjust boiler pressure after fitting the valve | Ensures the heating runs efficiently and safely afterwards |
FAQ:
- Can I really change a radiator valve without draining the whole system?Yes, as long as you isolate that radiator by closing both valves, release the pressure through the bleed screw and work with a tray to catch the water inside that single radiator.
- How much water should I expect to come out?Only the water contained in that radiator and the small bit of connected pipework, usually a few litres at most, not the entire system contents.
- Do I need to switch off the boiler first?Always turn off the boiler and let the system cool before starting so you’re not dealing with hot water or a pump suddenly pushing pressure at you.
- What if the new valve still leaks slightly after fitting?Try gently tightening the nut a little more; if it still weeps, you may need to redo the joint with fresh PTFE tape or check that the mating surfaces are clean and undamaged.
- Will I have to rebalance the radiators after changing a valve?Sometimes, especially if you touched the lockshield setting; you can rebalance by slightly adjusting those valves so each radiator heats up at roughly the same time.